Wednesday, April 28, 2010

Soft Buttermilk Cookies


My kids were asking me to bake cookies the other day, and I was trying to think of a recipe that I just haven't made for awhile. So, I decided to rummage thru some old cookbooks that I used alot when I was middle-school aged. This hand-written recipe card for buttermilk cookies fell out onto the floor from the pages of the one cookbook. It was such a coincidence because I had 2 quarts of buttermilk in the fridge and I've been trying to be inventive with ways to get it used up. When I saw this recipe, I decided to bake some Buttermilk Cookies! I can't remember ever making these before and I think that it was a recipe from a little recipe exchange we did in Home Economics class in school. So I don't know who the recipe came from, although I do recognize the hand-writing. The recipe didn't have frosting, so I added that, as they are good without, but even better with!!!


These cookies baked up so nice! I used my SILPAT (but you could use a lightly greased cookie sheet and be just fine :-} )and I used my small cookie scoop to make uniform cookies. This to me is an easy version of a sugar cookie. No chilling, rolling, cutting, etc. And who doesn't like a frosted cookie? These cookies aren't the most 'flavorful' cookie, as they are obviously meant to be frosted. I think they would be really good sprinkled with course sugar before baking. But, even better, FROSTED--with sprinkles!!


I think you could change these up by adding maple flavoring and decorating with chopped walnuts. Or even adding a lemon or an almond extract to the frosting. I like them just how they are!


Soft Buttermilk Cookies
Recipe by from cupboard to cupboard
1 cup butter, softened
2 cups sugar
2 lg eggs
2 tsp vanilla
5 cups flour
1 tsp baking soda
1 tsp salt
1 cup buttermilk

Cream butter and sugar until light and fluffy! Add eggs and vanilla and beat in. In a separate bowl, combine flour, soda and salt. Add dry ingredients alternately with buttermilk to the creamed mixture. Mix well.

Drop by teaspoonfuls on lightly-greased cookie sheets. Bake at 375 for 10-12 minutes or until edges are lightly browned. Cool completely on wire racks. FROST!!!!


Frosting:

1/2 cup butter, softened
2 lbs powdered sugar
1/2 cup milk
2 tsp vanilla

Beat butter and powdered sugar together, add vanilla then slowly add milk until frosting reaches desired constistency. Decorate with sprinkles:-)


Happy Cooking!

Teauna

Tuesday, April 27, 2010

**MY FIRST AWARD**


After spending a nice day with my husband yesterday, I got home to check my blog and to my surprise, I had an awesome message from Mary, a stay-at home foodie from Ohio. She gave me this fun award and I was so excited! My FIRST Foodie Award! After perusing her blog, I was amazed at how much we have in common! So fun to see that there are people everywhere, even on the other side of the States that are just like me! So cool!
To let you know, the purpose of these awards is to show appreciation for our fellow bloggers, and recognize the blogs that we keep coming back to; as such, this award comes with a few stipulations:
The rules of accepting this award are as follows:
-Put the logo on your blog or within your post.
-Pass the award onto 10 bloggers.
- Link the nominees within your post.
- Let the nominees know they have received this award by commenting on their blog.
-Share the love and link to the person from whom you received this award.
-Lists things that make you happy.
Things that make me happy
1. My family.... my husband & 2 children are my world!
2. The sunshine! I love the warm weather and sunshine!
3. All of our fun animals... eventho everyone cracks jokes at my 'petting zoo' :-)
4. My friends!!! The true friends that are there thru thick and thin! You know who you are!
5. Cooking & Baking! It is my prozac!
6. My hobbies... making glycerin soap, lotions, lip balms, wood-crafts, and BAKING!!!
7. My MOM! She keeps me going! Oh how I love her!! Thanks Mom for teaching me how to cook and bake, and even how to enjoy it!
Now for the Happy 101 Award, I congratulate the following sites:
Happy Cooking!
Teauna

Saturday, April 24, 2010

**CHOCOLATE LOVERS DESSERT**


Alright.... I have to say this is one of my FAVORITE desserts... not only because it's so good and chock full of chocolate fudgey and gooey goodness, but because it is sooooooo easy! This is one of my go-to recipes in the summer when I cook in the Dutch Ovens! But it works just fine in your oven. If you have a 12-inch Dutch Oven.... use it!! If not, use a 4-5 qt. pot with a lid. You can use a Dutch Oven in your oven and it works just great. And for some reason, when ANYTHING is cooked in a Dutch Oven, it simply tastes better! I have an awesome 5 qt. enamilized Dutch Oven that I like to use.... my Mom gave it to me and I have LOVED it, so if you ever have an opportunity to purchase one, DO IT!!! You will not regret it!


If you are choosing to use a Dutch Oven... line it with aluminum foil. If you are using a pot, you can also line it with aluminum foil or you can just well-grease it! The aluminum foil just helps in the whole clean-up process. And with a Dutch Oven, that's always a plus right???


Now for the fun!


CHOCOLATE LOVERS DESSERT


Mix together:

1 1/2 cups water

1/4 cup cocoa

1 cup brown sugar


Pour in the prepared pot or Dutch Oven...


Now sprinkle 2/3 bag of Mini Marshmallows over top of chocolate mixture...


Mix a cake mix ( I like Betty Crocker Chocolate Fudge Mix) as directed on box. Pour over top of marshmallows.


Finally sprinkle with 1/2 cup + mini chocolate chips.


Bake at 375 covered for 30 minutes, then take off lid and bake for an additional 15 minutes. This will look kinda gooey because the marshmallows and the first mixture actually turn into a hot fudge. It can jiggle just a little bit, and be careful not to overbake it! Serve with vanilla ice cream while it's still warm! yummy!!!

This recipe will be requested by everyone again and again! ENJOY IT!!!


We will be revisiting this recipe when the warm weather comes and I will give you all the info on how to cook with charcoal! So FUN!!!!


Happy Cooking!

Teauna

Tuesday, April 20, 2010

Gingery Banana Waffles


I am so sorry for being gone for 10 days! Wow, how I missed cooking and baking! But, I had the privilege to be able to spend my Grandma's last hours with her last week and then of course, comes all of the funeral arrangments and family time. It was good to spend "family time" but it feels good to finally be getting back into my schedule. I have so much I need to accomplish and because I need to stay busy to keep my mind going in the right direction, I should be able to catch up soon.

I have been searching through cookbooks all day trying to find a recipe that hit me just right... something new and fresh... perhaps a breakfast food? I thought of breakfast because bacon sure sounded good to me.

So after searching for hours, I have to tell you that I found a recipe that will be forever treasured in my recipe box. If I could find a way to bottle up the aroma from these waffles as they're baking, I would bottle a whole bunch up and make a million dollars off them! They would be the ideal candle! Oh yummy! And they taste just as good as they smell, having just the perfect amount of spice with the soft moist texture from the bananas. You're just going to love them!


Gingery Banana Waffles


3 cups flour

4 teaspoons baking powder

2 teaspoons ground cinnamon

1 1/2 teaspoons ground ginger

1 teaspoon salt

4 eggs

2/3 cup brown sugar, packed

2 extra-ripe bananas

1 1/4 cups milk

1/2 cup molasses

1/2 cup butter, melted


Preheat waffle iron. In large bowl, combine flour, baking powder, cinnamon, ginger and salt. In medium bowl, beat eggs with brown sugar until light and fluffy. Puree extra-ripe bananas in blender. Beat pureed bananas, milk, molasses, and butter into egg mixture; add to dry ingredients. Stir until just moistened. For each waffle, cook 3/4 cup batter in waffle iron until golden brown. Serve with sliced bananas and syrup. Makes 8 servings.


Enjoy!

Happy Cooking!

Teauna

Saturday, April 10, 2010

How to Cook & Eat an Artichoke & YUMMY SPINACH ARTICHOKE DIP

After getting my Bountiful Basket today, I had several emails inquiring about artichokes. "How do you cook an artichoke?" ... "What do you do with artichokes"... "Do people seriously eat these things, they're kinda ugly?"... "Can I make that yummy Spinach Artichoke Dip out of this ugly thing?", etc... So I looked into it. You can certainly cook these things up and eat them. It is a bit of a process, but I think it sounds like it should be quite the learning experience too. My favorite go-to cookbook when I have a question like this is a really old Betty Crocker cookbook of my Mom's. It is full of information on how to cook veggies that you've never heard of :-) So that is where I am pulling this information from.

To cook an artichoke:

Allow 1 artichoke for each serving. Remove any discolored leaves and the small leaves at base of artichoke; trim stem even with base of artichoke. Cutting straight across, slice 1 inch off top and discard the top. Snip off points of the remaining leaves with scissors. Rinse artichoke under cold water.
To prevent leaves from spreading during cooking, tie string around artichoke and from top to bottom to hold leaves in place. Invert cleaned artichoke in bowl containing 1 tablespoon lemon juice for each quart water to prevent discoloration.
Artichokes should be cooked in a large kettle. For 4 medium artichokes, heat 6 quarts, 1/4 cup vegetable oil, 2 tablespoons lemon juice, 1 clove garlic (cut into fourths), and 1 teaspoon salt to boiling. Add artichokes. Heat to boiling; reduce heat. Simmer uncovered, rotating occasionally, until leaves pull out easily and bottom is tender until leaves pull out easily and bottom is tender when pierced with a knife, 30 to 40 minutes. Remove artichokes carefully from water (use tongs or two large spoons); place upside down to drain.
To serve hot:
Remove string but do not remove choke. (Choke is the fuzzy growth covering artichoke heart.) Place artichoke upright on plate. Dip in Lemon Butter (recipe follows):
Lemon Butter:
Heat 1/4 cup margarine or butter over low heat until melted or microwave uncovered in 1-cup glass measuring cup until hot and bubbly, about 45 seconds. Mix with 1 teaspoon grated lemon peel, 2 tablespoons lemon juice and, if desired, 1 tablespoon snipped chives.
To Eat:
Pluck leaves one at a time. Dip base of leaf into a sauce or lemon butter. Turn leaf meaty side down and draw between teeth, scraping off meaty portion. Discard leaf on plate.
When all outer leaves have been removed, a center cone of small light-colored leaves covering the fuzzy center choke will be exposed.
Pull or cut off cone of leaves. Slice off fuzzy choke with knife and fork; discard. Cut the remaining "heart", the prize section and use for this YUMMY SPINACH ARTICHOKE DIP!

YUMMY SPINACH ARTICHOKE DIP
original recipe from Charlie, my friend
Printer-friendly version
4 artichoke hearts, cut up in small pieces
10 oz fresh spinach or 1 pkg frozen spinach, thawed and drained
1 clove of garlic, pressed
1/2 cup sour cream
1/2 cup mayo
3/4 cup grated parmesan cheese

Stir ingredients together and place in a baking dish. Bake at 375 degrees for 20-25 minutes. Or you can place all ingredients together in a dip-sized crockpot and slow-cook it.

Serve with celery sticks, chips, crackers, or toasted bread...

Happy Cooking!

Teauna

Strawberry Yogurt Scones


So...I have had an obsession with buying strawberries at the store because they have been soooo cheap. Everytime I ran in for something I grabbed another carton not even thinking about how many I already may have at home. Then when I ordered my Bountiful Basket this week, they had an add-on option of 12 lbs of strawberries for $8! That's an awesome price! Once again, I got MORE strawberries! So, I decided there were probably a bunch of people that ordered them and that we were ALL going to need some recipes to use them up! I've been searching cookbooks, magazines, & the internet for recipes using strawberries. I have found several and am so excited to try them. Strawberries are just so pretty and they look so enticing! And the yummy sweet flavor is just a plus! I tried these scones that I found on Annies-Eats Blog. I had to change them up to work with what I had on hand. They are a healthy breakfast and they have just the right amount of sweet! I'll certainly be making them again!


Strawberry Yogurt Scones
Adapted Recipe by From Cupboard to Cupboard
Original Recipe from Annies Eats
1 1/2 cup flour
2/3 cup whole whear flour
1/2 cup sugar
2 tsp. baking powder
1/2 tsp. baking soda
1/4 tsp. salt
3/4 cup diced strawberries
2/3 cup lowfat vanilla yogurt
3 Tbsp. butter, melted
1 tsp. lemon peel
1 egg white, slightly beaten
2 tsp. sugar
Preheat oven to 400 degrees. Combine flours, sugar, baking powder, baking soda and salt in a large bowl. Combine strawberries, yogurt, butter, lemon peel, and egg white. Add to the flour mixture and stir just until moistened. Turn onto a lightly floured surface. Knead dough 4 times or until all ingredients are well incorporated. Pat into an 8" circle on a baking sheet lined with a silpat or sprayed with cooking spray. Cut into 8 wedges. Sprinkle with 2 tsp. sugar. Bake for 20 minutes or until lightly browned.
Enjoy!
Happy Cooking!
Teauna

Tuesday, April 6, 2010

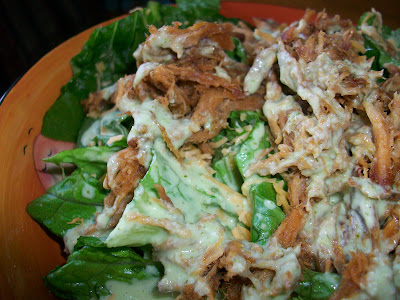
Cafe Rio Pork and Tomatillo Ranch Dressing


One of my favorite things to do is look for yummy new recipes to try... I have so many cookbooks and cooking magazines that I have to store oodles in big rubbermaid containers because I'm out of space in my cupboards and on my shelves. And then there's this awesome thing called the internet! Wow! I get on the internet and go through all these amazing cooking blogs that are out there and find some really great new recipes.


Lately I have been craving Cafe Rio Pork Salad. I have a recipe that uses brown sugar, salsa, and coke. I like the flavor of it but it just isn't quite what I'm looking for. I have looked at all these cooking blogs and found many different variations of Cafe Rio Pork. When I found this one, I just knew it was the one!!! So, I tried it! O....M....G!!! Like if I didn't know better, I would have thought it came straight out of the Cafe Rio kitchen! It is THAT good! And THAT close! I found the pork and dressing recipes on Anne Strawberry's Blog. She has some amazing recipes and I'm excited to be able to keep trying more! Then I went on another search for the cilantro lime rice. After perusing over bunches of different variations of this recipe, I decided to try this one, found on Tasty Kitchen. The rice was good and the rice cooker made it so easy! It definately completed the salad! So now, for the Pork and Dressing recipes:


Cafe Rio Pork
Printable Recipe
Recipe adapted from Anne Strawberry

4 lb pork loin roast
1 can Dr Pepper
1 cup brown sugar
2 Tbsp dry mustard
1 Tbsp cumin
2 cloves garlic, minced
1 can chipotle chiles in Adobo sauce

First open can of chiles and drain the sauce into the crockpot. ( FYI~~I used a 5 qt dutch oven and cooked this in the oven!) Discard the chiles. Chipotles are just roasted jalapenos and are darn hot so don't use them unless you can TAKE THE HEAT! Add sugar, mustard, cumin, garlic and Dr. Pepper. Stir everything and toss in trimmed pork loin. Pierce it several times so that the juices absorb in it better. Cook for 5 hours or so, turning the roast every hour or so. Make sure that there is always plenty of liquid so that your roast does not burn and go dry. I cooked it in the oven, covered, for 5 1/2 hours. When the liquid was low, I just added a couple cups of water. Shred this pork and let sit in the juices before serving. The longer it soaks up the juice before serving, the better it will be!


Now for the dressing:

Tomatillo Ranch Dressing
Recipe Adapted from Anne Strawberry

4 tomatillos, outer shell removed, rinsed and cut into fourths
1/2 cup mayo, NOT miracle whip
1/2 cup milk
1 packet Ranch Dressing Mix
A bunch of cilantro, washed and stems discarded
Juice from one lime

Place all ingredients in blender and blend until smooth. (I love my Vitamix!) Refrigerate until set. Serve with Cafe Rio pork!!

Happy Cooking

Teauna

Saturday, April 3, 2010

Easter Bunny Cake


*Cutting the cake in half**

*"Gluing" the cake together**


**Frosting the cake**


**Add eyes, nose, whiskers, & ears**


**A front-side view of the little guy**


** the back-side view... isn't it so cute?**


This is another GREAT tradition that my Mom started with my brother and I when we were young. We made Easter Bunny Cakes every single Easter. Because we only made them once a year, they were always something I know I looked forward to! This is a really simple way of having some fun in the kitchen with your kids! Wow your family with this Cute little cake when you take him for dessert! Happy Easter!


Easter Bunny Cake
Recipe from Kathy Williams, my Mom!
1 cake mix, your flavor of choice, prepared as directed on box
1 pkg of dream whip, prepared as directed on box
1 pkg of Hostess SnoBalls
Coconut
green food coloring
toothpicks
jelly beans
other Easter Candy for decorating
Pink construction paper cut into ears

First prepare your cake... Now there are options here. If you want 1 cake, use a 10-12 inch round pan. If you would like 2 cakes, use 2 8 or 9-inch round pans and bake as directed... Let cool completely and remove from pan. Cut cake in half as shown.

Prepare Dream Whip as directed on box. You could use any other frosting that you like more... I just love Dream Whip. Cream cheese frosting is my second favorite!

Frost between the two halves to hold them together. Then frost the whole cake. Strategically place that cute little tail (a snoball) just where it should be :-) The only snoballs I could find were purple so I also frosted the tail with Dream Whip. Now if you want the cake to have a "furry" texture. Throw some shredded coconut at it. People around here aren't all big fans of coconut, so I skip that step, however it is so so cute!

Now cut out the bunny ears from the construction paper and place in the head. Push them down a ways so they stay in. Place jelly beans for eyes and nose and toothpicks for whiskers.

To decorate, color some coconut green for grass. Place around the sides of the bunny and I like to make little nests with jelly beans or other egg-shaped candies. I just get all giddy and excited when I make these every year. The kid just comes out again!!!

Happy Easter and Happy Cooking!

Teauna

Seafood Pasta Salad


Ever since I was a little girl, my Grandma Kay has made the BeSt Macaroni Salad EVER!!! When you ask her what she puts in that salad, she always says "Everything but the kitchen sink!". My Grandma is an amazing cook and I enjoy trying to mimick those same flavors that I have eaten at her home for a long time. This recipe is my closest attempt to Grandma's "Everything but the Kitchen Sink Salad"... I hope you also enjoy it! MMMMM mmmmm Good!


Pasta & Crab Salad
an original recipe by fromcupboardtocupboard


1 1/2 cups mayonnaise or sald dressing

3/4 cup zesty Italian salad dressing

6 Tablespoons grated Parmesan Cheese

1 16 oz pkg frozen green peas, thawed, rinsed & drained

8 ounces Rottini pasta, cooked, rinsed & drained

8 ounces chopped imitation crabmeat

1/2 cup chopped green peppers, optional

1/2 cup chopped tomato, optional

1/4 cup sliced green onion, optional


Combine mayonnaise, Italian salad dressing and cheese in large bowl; blend bowl. Add peas, pasta, crabmeat, pepper, tomato, & onions; toss gently to mix. Cover & refrigerate for at least 2 hours. Makes a large bowl of salad great for serving a crowd...


Happy Cooking!

Teauna