Sunday, October 31, 2010

Homemade Chicken Nuggets and Yummy Oven Fries


How do you get your kids to eat their veggies?  Surprisingly veggies are the one thing that every member of my family will eat.  I saw the idea for these chicken nuggets here and have just wanted to make them so badly.  They call for ground chicken (they also call for veggies ....eeeeh!).  So, I was thinking that I could just go into the store and get some ground chicken.  WRONG!! I have spent two weeks asking butchers to grind me chicken just to be turned down, looking in the frozen section for the little pound tubes of ground chicken (you know... like ground turkey comes in), and I finally learned that I would obviously just be better off grinding my own chicken.  Problem... I don't have a meat grinder!  Well, my sweet grandma has one and she was kind enough to let me borrow it for a few hours.  I went to the local butcher and bought a bag containing almost 10 pounds of chicken.  I trimmed all the fat off of it.  Then cut it into 2 inch pieces and ground it.  I then measured it out and placed a pound of ground chicken into quart sized freezer bags.  (When you do this, make sure to get all the excess air out of the bags to prevent freezer burn.)  I ended up getting 6 1/2 lbs of ground chicken.  My sweet little girl labeled the freezer bags neatly, however as much as we enjoyed these, those 6 pounds aren't going to last too long.  (grinding this meat took about 45 minutes from start to finish) 


Homemade Chicken Nuggets
original recipe from Cheeky Kitchen
adapted by From Cupboard to Cupboard
1 16-oz pkg frozen California-style veggies, thawed out
1 1/2 lbs ground chicken
1 tsp onion salt
Crispy Coating Mix (recipe to follow)

Thaw out your package of California-style veggies and blend in your blender.  Mix veggies, chicken and onion salt together.  Preheat your oven to 400 degrees.  Grease your cookie sheet.  Prepare your crispy coating:

note my little helper's beautiful hands... I love her helpful hands in the kitchen.

Crispy Coating Mix
recipe from More Make-A-Mix Cookery

3 cups corn flake crumbs
1 cup wheat germ
1/2 cup sesame seeds
4 teaspoons dried parley leaves, crushed
1 tablespoon paprika
2 teaspoons salt
1 teaspoon dry mustard
1 teaspoon celery salt
1 teaspoon onion salt
1/2 teaspoon ground pepper

In a large bowl, combine all ingredients.  Stir with a wire whisk until evenly distributed.  Pour into a 5-cup container with a tight-fitting lid.  Seal container.  Label with date and contents.  Store in a cool dry place.  Use within 2 months or freeze.  Makes about 4 1/2 cups crispy coating mix...

NOW:
So there are bunches of ways you could do this!  This is the way we chose to do it:
First, put a layer of crumb mixture on the countertop or cutting board.  Then, grab a handful of the chicken/veggie mixture and press it down onto the crumb mixture.  Then sprinkle the chicken with more crumbs and press down into the meat to coat it.  We used a pizza cutter to just cut bite-size squares (My mom and I didn't figure my dad would be impressed by fun shapes :) ) You could just make single chicken nuggets and press them each into the crumb mixture, or your could cut them into shapes with cookie cutters.  Just do as you please! Now place the chicken nuggets on the prepared cookie sheet and bake them for 14-16 minutes in your preheated oven. 

so they weren't all the same size, but they were DELICIOUS!

For the Yummy Oven Fries:

Scrub 1 potato per person being served.  Wedge the potatoes lengthwise.  In a large (gallon-size) ziploc bag, add some olive oil.  Place the wedged potatoes in the bag and seal the bag.  Shake well to coat all the potatoes with olive oil.  You can either add your seasoning to the bag at this point, like ranch dressing mix, salt and pepper, etc.  We just added salt and pepper and shook well making sure each potato has been seasoned well.  Place them on a cookie sheet (no need to grease) and bake in your 400 degree oven.  They should bake for nearly an hour.  So place them in the oven approximately 45 minutes before your plan on placing your chicken nuggets in the oven.  Then simply place your chicken nuggets on the lower rack when  there is approximately 15 minutes of cook-time left on your potatoes.

Serve with bbq sauce, ranch dressing, & fry sauce.  And remember, no need for adding veggies, as you already did!

Happy Cooking!
Teauna

Saturday, October 30, 2010

Sugar Cookie Bars Revisited


Hey everyone!  I've been pretty busy baking and cooking for Halloween, eventho it's my least favorite holiday of the year.  It is a great excuse to bake up some really cute little goodies.  Sugar cookies are usually a favorite of our family and this year I baked up a batch and forgot to take pictures when they were all done. But I did bake up a couple sheets of Sugar Cookie Bars, which is a recipe I previously posted and have heard great feedback on,  and I'm thinking if you're looking for an easy recipe to impress all your family and friends on Halloween, this is the one!  They are in & out of the oven, frosted and ready to eat within an hour of mixing them up!  And to top it off, they're scrumptious!  Go HERE for the recipe!  Enjoy!

Happy Cooking!
Teauna

Tuesday, October 26, 2010

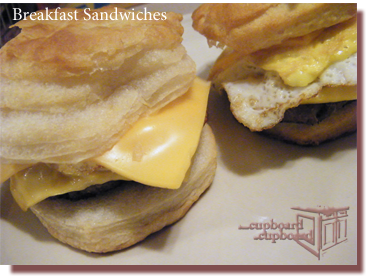
Breakfast Sandwiches

Buttermilk biscuits.... sausage.... bacon.... melting cheese.....ham.... eggs!  Sounds like breakfast to me!  And an easy one at that! Do you ever just wake up and want to make everyone a special treat but you don't have much time? Well these yummy and versatile breakfast sandwiches are your answer! Whether you like making homemade biscuits or you have a can of refrigerated biscuits, or even a package of whole wheat (for the health-conscious soul)english muffins.... whatever it is that you have, it'll work.  We have the world's best butcher not too far from here and they make the BEST sausage ever!  My family just loves it.  So when I make these biscuits, there is no question what meat is used! It's Theurer's American Style sausage.  But, when I make mine I use turkey sausage and a Whole Grain english muffin. Any way you make them, they're way yummy and very filling. Make them your own!

Breakfast Sandwiches
by From Cupboard to Cupboard
printable recipe

1 can JUMBO refrigerated biscuits {I like to really stock up on these & have them handy in the fridge when they're on sale :)}
Your choice of meat, cooked
Eggs
Cheese of your choice, sliced
First, get your oven preheated and follow the directions on the can of biscuits.  Get them in the oven baking and start cooking your meat.  Cool the biscuits on a wire rack directly after taking them from the oven.  Fry your eggs to your liking.  We don't like runny yolks around here so mine are well done!  Don't forget to salt & pepper your egg to taste:)  Now cut your biscuit in half and simply stack your yummy food.  I place the meat, then cheese, the egg, then another slice of cheese.  We like them this way!  Besides, a little extra cheese just makes my day sometimes, does it yours?

Some different ingredients you can use:
Your own favorite recipe for biscuits...prepared
turkey sausage
turkey bacon
bacon
ham or canadian bacon

You can also mix eggs well and pour them in a pan and let them cook as if you were making an omelet.  Then flip it over and when it's thoroughly cooked, just cut into squares.  Whatever works best for you!

Happy Cooking!
Teauna

Friday, October 22, 2010

Halloween Mini Cheesecakes


I have been on a baking craze lately and have had the best day ever today just baking and relaxing... and taste testing.  I have to admit to all of you, I am not a big fan of Halloween.  The creepy, crawly, scarey, bloody, icky stuff just doesn't excite me AT ALL! However, I love baking treats for Halloween.  They're so bright and colorful! And you can really think outside the box and people don't judge:) So, I was thinking this morning (after getting the chicken in the pot for some yummy Homemade Chicken Noodle Soup) about what I could make for a fun "Halloween type" dessert for tonight.  Of course, I have this one favorite food of mine... OREOS! { I swear OREO's should be a food group of their own.} Who can turn down all the colorful new seasonal OREO's?  Obviously not me!  They're just so enticing, aren't they?  Oh and then of course, there's this wonderful ingredient designed just for my taste buds... CREAM CHEESE!!! Seriously, what's better than a combination of these two amazing things?  Not much, really. These Mini Cheesecakes are sooooo good.  They aren't too time consuming and don't call for any crazy (not a staple in my kitchen) kind of ingredients. 
So, I have this notebook filled with recipes that I've found here and there and just copied it down. This recipe is one that I found in my infamous notebook of "who knows where these came from, but I gotta try 'em" recipes.  So... to whomever you are out there that developed this recipe.... Oh How I Love Thee!  Let me count the ways...... one one thousand, two.... {whoa Tea, snap out of it!}.. Once again, it's the OREO's talking!
So take a plunge and make yourself (and your favorite people) some Halloween Mini Cheesecakes!  You won't be sorry! 

Halloween Mini Cheesecakes
adapted by From Cupboard to Cupboard
Printable Recipe

30 whole HALLOWEEN OREO cookies, divided
2 8 oz pkgs Cream Cheese, softened
1/2 cup sugar
1 tsp vanilla
2 eggs
1/2 c sour cream
orange food coloring

Preheat oven to 275 degrees.  Line a muffin tin with cupcake liners (24).  Place 6 whole OREO cookies in a food processor and grind them up (or smash them in plastic bag).  Put 1 whole OREO in bottom of each liner.  Beat cream cheese until smooth.  Add in the sugar and mix until combined.  Mix in vanilla.  Slowly add in eggs and continue mixing.  Add sour cream and mix to combine.  Use a spatula to scrape bowl.  Add in food coloring. Then add in oreo crumbs and stir just until combined.  Fill each liner about 3/4 full.  Bake for 22 minutes.  Allow to cool on wire rack.  Refrigerate for at least 4 hrs.  Remove liners and garnish with whipped cream and a cute little sugar pumpkin :)

Happy Halloween!

Happy Cooking!
Teauna

Saturday, October 16, 2010

From Cupboard to Cupboard Weekend Challenge #4

Awww!  The tastes of fall!  My FAVORITE time of year! Don't think I've mentioned that yet, have I? {insert giggle here}... I wait EVERY year for all of the recipes for the latest Chex Mixes!  When I saw some of the ones this year, I was soooo excited!  Around here, fall is the time for hunting, hiking, sight-seeing, and running around like crazy people!  So having some healthy snack-foods in hand {or purse, or backpack} is an excellent idea!  Any snack mix works great, but let me just tell you..... this stuff is T.A.S.T.Y!!!  The perfect mixture of spice and sweet!  Mmmmm Mmmmmm Good! 
Now for the Challenge this week, I have made this just basic. I didn't even add in the nuts that the recipe called for because my little family isn't all fans of pecans.  So, I thought it would be fun to change it up a bit.  I added about a 1/4 cup of the cute fall M&M's.  It added just enough color for me and of course, chocolate!  But, the challenge is for you to change it up to your liking.  The recipe is extremely simple and takes about 10-15 minutes from start to finish.  So easy!  I can think of so many different things that could be added to add color, texture, etc.  So, what are you going to add?  Add what you like, change it up, or just follow the recipe exactly... but whatever you do, make sure you post the recipe on your blog and link your blog here by going to the linky below this post.  Make sure you put my challenge button on your blog to let people know where to come!  I can't wait to see what you all come up with! 

Chex Pumpkin Pie Crunch
original recipe from TOH Cooking School 2010
adapted by From Cupboard to Cupboard
printable recipe

1/4 cup brown sugar
1 Tbsp pumpkin pie spice
1/4 cup butter
2 tsp vanilla
2 c Cinnamon Chex
2 c Wheat Chex
2 c Honey Nut Chex
8 oz pecans (I didn't use these!)

In a small bowl, mix brown sugar and pumpkin pie spice; set aside.  In a small microwave-safe dish, microwave butter on high about 30 seconds or until melted.  Stir in vanilla.  In a large microwavable bowl, mix all cereals and pecans.  Pour butter mixture over cereal mixture, stirring until evenly distributed.  Add sugar and spice mixture and stir until coated.  Microwave uncovered on high for 5 minutes or until mixture begins to brown, stirring every minute.  Spread on wax paper (Of course, I used my SILPAT!) or a cookie sheet to cool.  Store in an airtight container.

Add in Ideas:
M&M's
candy corn
nuts of some sort
dried cranberries
cinnamon chips

Happy Cooking!

Teauna

Powered by Linky Tools
Click here to enter your link and view this Linky Tools list...

Wednesday, October 13, 2010

Pumpkin Scones

What a hectic few days!  I have had all these plans to make these delicious scones, but my life and my ideas have not been communicating amongst themselves too well!  This morning, I finally just buckled down and started baking.  My house was chilly and I refuse to turn on the furnace right now...I figure, if you're in my house and a little cold then wrap up in a blanket.  Duh! :) But to help take the chill off, I thought it wasn't too bad of an idea to use the oven! Well, my life as of now is ALL BETTER!  These scrumptious, moist, and beautiful pumpkin scones made everything all better and for a moment, I forgot about all the "stuff" around me that needs to be done!  And to make it even better, the daycare kids AND my picky husband LOVED them!  Try them... you will not be sorry!

Pumpkin Scones
from Annie's Eats (No need to adapt... it is absolutely perfect!)
printable version

2 cups flour
1/3 cup packed brown sugar
1/2 tsp ginger
1/2 tsp cinnamon
1 tsp baking powder
1/2 tsp baking soda
1/4 tsp salt
1/2 cup cold butter, cut into pieces
1/3 cup butterscotch chips
1/2 cup buttermilk
1/2 cup pumpkin puree
1 tsp vanilla

Glaze:
1 cup powdered sugar
1/4 tsp cinnamon
dash nutmeg
dash ginger
2 Tbsp milk


Preheat the oven to 400° F. Line a baking sheet with parchment paper or a silicone baking mat.

In a medium mixing bowl, combine the flour, brown sugar, spices, baking powder, baking soda and salt; whisk just to combine. Add the cold butter chunks to the bowl and stir with a fork to combine. Cut the butter into the dry ingredients until the mixture resembles coarse crumbs and the largest butter pieces are no bigger than peas. Mix in the butterscotch chips. In a small bowl or measuring cup, combine the buttermilk, pumpkin puree and vanilla extract. Add the wet ingredients to the bowl with the dry ingredients and stir together gently just until the dough comes together. If necessary, knead a bit with your hands, but be careful not to overwork the dough or you will end up with a tough scone.

Transfer the sticky mass of dough to the prepared baking sheet. Pat the dough into a 8 or 9-inch round. Bake until a toothpick inserted in the center comes out clean, about 22-25 minutes. Allow to cool to room temperature. Slice the dough round into 7 or 8 wedges.

To make the glaze, combine the powdered sugar and spices in a small bowl. Add the milk and whisk to combine, until a thick glaze is formed. (If necessary, add a bit more milk to achieve a consistency good for drizzling the glaze.) Use a whisk to drizzle the glaze over the finished scones (I use a plastic baggie with a tip cut off). Allow the glaze to set before serving.

Happy Cooking!

Teauna

Sunday, October 10, 2010

IMPORTANT!!!

 I haven't heard from the winner of the CSN Giveaway! Go here to see if it was you!  If I don't hear back by Tuesday, I will be drawing a new winner!

Thanks!

Happy Cooking!
Teauna

Friday, October 8, 2010

FCtC Weekend Challenge #3- Dijon Porkchops & Potatoes

I took note of all the requests on the last drawing... {thank you!} and realized that many of you are interested in fast and easy crock-pot meals.  Like I said last week, I don't really use my crock pot alot, but I have to admit... IT IS SO HANDY!  I have been feeling under the weather this week and have done pretty much nothing other than bottleing salsa and chili sauce so my tomatoes don't go to waste.  I had no daycare kids today and decided I had ALL day to make another batch of salsa and one of chili sauce.  Well, that pretty much takes up all of my counter space and stove top, so the crock pot came to the rescue once again!  My 11 year old does not really care for any meat, but if it is cooked with any sort of potato, he'll at least try it!  Pork chops are one thing he will try no matter what.  So pork chops it was! And of course, had to add potatoes so he'll even consider trying it :-)  I was in a hurry so that I could get going on the canning stuff.  I just got out my food processor and cut up my potatoes, which of course, cut them thinner than I really would like them.  But they're still really good.  I like the touch of spice that the thyme and dijon mustard gives these potatoes!  And the pork chops become exceptionally moist and tender when cooked this way... So now, you need to try them for yourselves!  Just go to the right side of the page and grab the weekend challenge button.  Put it on your blog.  Post pictures of your DIJON PORKCHOPS & POTATOES. Of course, change it up like you wish or leave it just how the recipe states.  Let us all know what you like, don't like, changed, or sould change next time.  Write up a post about this Weekend Challenge and let everyone know they're welcome to come join in the fun!  Make sure you come back and link up your blog so everyone can check out what you've done!  Thanks:-)


DIJON PORKCHOPS & POTATOES
recipe adapted by From Cupboard to Cupboard
printable recipe

1 can Cream of Mushroom Soup
1/2 cup chicken broth
1/8-1/4 cup dijon mustard
1 teaspoon ground thyme
1 clove garlic, minced
1/4 teaspoon black pepper
5 potatoes (medium-sized), cut into slices (I suggest slicing them at least 1/4 inch thick)
1 onion sliced (optional)
4 boneless pork chops, cut thick

In a large bowl, stir together soup, broth, mustard, thyme, garlic and pepper.  Stir in potatoes and onions until coated.  Transfer to a 4 or 5 quart crock pot.  Place pork chops on top of potatoes and season with salt and pepper.  Cover; cook on low heat for 7-8 hours or high heat for 3-31/2 hours. Serves 4

Tuesday, October 5, 2010

The WINNER of the CSNStores Gift Certificate is........

So..... first, I obviously need to apologize that I didn't draw the name out of the hat last night like I had promised.  Oops!  But, then I have to say "It isn't my fault"!!!!!  hee hee.  My internet has been down and to be honest with you,  I got so frustrated with it and didn't feel good anyway, so I went to bed instead!  A girl needs her rest!  Well, I finally got the job done!  And to save you from hearing any more of my ramblings, the winner is:

...

TeaLady said...

I really need a new immersion blender. Mine drowned.

September 27, 2010 1:45 PM

Congratulations TeaLady!!! Please email me { teawclark at gmail dot com } so that I can get you the code you need to use your gift certificate at any of the CSN online stores!

Thank You everyone for participating in this giveaway!  And thank you CSN stores for the great giveaway! 

Happy Cooking!

Teauna